Friday, January 30, 2015

February FUN!

FEBRUARY IDEAS 

GROUNDHOG'S DAY!

With the winter we've had, I hope that the little groundhog does not see his shadow so that I can expect spring sooner rather than later! 
I write this as it's still snowing outside my window, but one can hope!  Here's a cute, simple craft to do with kids.

Take a pre-cut piece of construction paper (to fit the height of the toilet paper roll) and have the children draw the eyes (or use googly eyes or eye stickers), nose, and whiskers in the middle of it.  Then, put some glue on the paper, roll the paper around the toilet paper roll, and use a piece of tape to secure it.  Children drew ears on white construction paper with a brown/black marker, cut them out, and glued them to the inside of the roll.  You could also take a flashlight and shine it on the groundhog to discuss shadows.  


Here's another fun Groundhog's Day activity to do with young children.  You can grab it here for FREE at my store!  Hopefully, despite what the groundhog says, spring will come early!


With all the snow we've had, students have been doing a lot of GoNoodle (I've spoken about that site down below), but they also love to create their own Jackson Pollack design on the Smartboard.

I'm hooking up with Lori Ross for Terrific Tech Tuesday to share a fun indoor activity to do on the smartboard. Click on her link to find more tech ideas.


One of our favorite indoor recess activities is to create our own Jackson Pollack. Jackson Pollack was an American painter who became famous for his drip paintings. Click on the website for  Jackson Pollack.  Our art teacher taught my kinders about him, so they loved making their own creation.


When you click on the link, there will be a white space to the right.  Just click full-screen and let the fun begin. They can start to draw by touching the Smartboard. The slower they draw, the thicker the line, and the faster they draw, the thinner the line.  Every time they pick up their finger, the color changes.  My kids love it!

Here's an example:


Here is one of my favorite creative writing ideas to do for Dental Health.  We usually read a story (click here for a list of books) about the Tooth Fairy and the kids write what they think she does with their teeth.  From K-2, their ideas and drawing are great!


If you'd like to do this activity, you can click here to grab the tooth template at my store for FREE! 
Just add a picture and some construction paper and you're done!   

Hopefully, you took advantage of Colgate's FREE classroom set of  toothbrushes and books for your classroom.  If not, scroll down below to sign up. Hopefully, it's not too late!

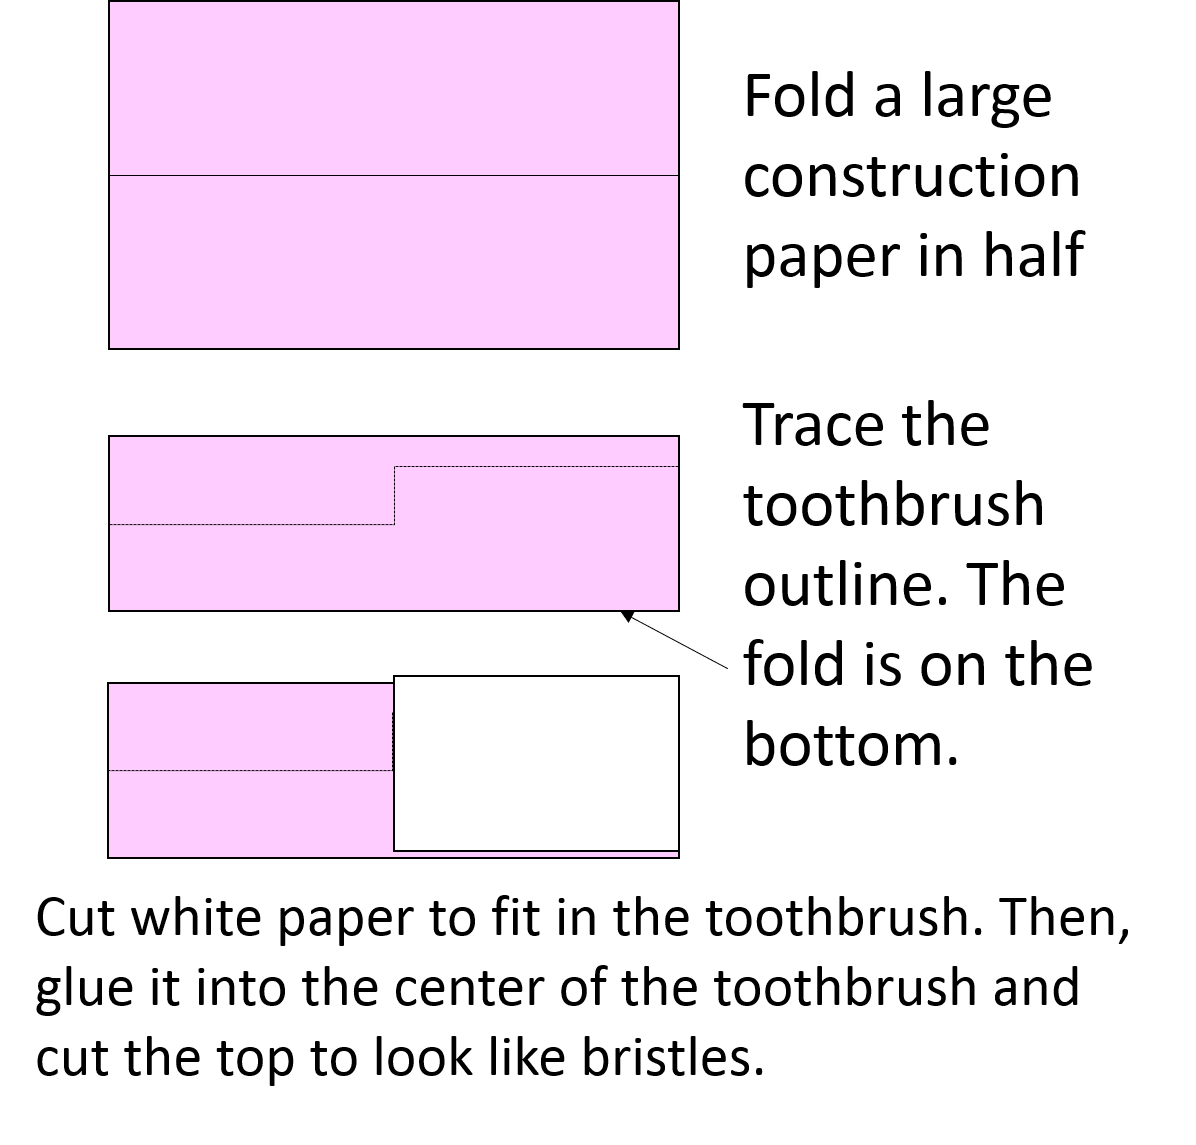
Here's a cute craft we did for Dental Health Month.

We decorated the front, and on the back, we wrote a dental health rule.
Here's how we did it:


PRESIDENT'S DAY

February is a great time to introduce coins and practice counting money.  My kids love to use task cards so I created these and they love them. There is also a reader so that they can learn all about the coins, who is on them, and how much they are worth.  Included are also printables and a money booklet for each child to take home as a culminating activity. Check out this Money Unit here.


Here's a perfect craft to go with President's Day. 
They turned out super cute.  These are not my original idea but I do not know the origin of it- if it's you , let me know! We created these after we learned about the presidents and we use these to check for understanding.  I asked a question about a president and students raise whichever president is the correct answer.  For example, Who was the first president of the United States? Who was a lawyer?


Here is this month's FREE Color by Number.
HAPPY VALENTINE'S DAY!


You can grab this Free Valentine's Day Picture by clicking here or visit my store. If your kids enjoy it, please let me know.


Stay Tuned and Follow for More Ideas!

Thursday, January 22, 2015

100th Day of School Activities


100th Day of School
 Woo hoo!

So... who's excited about the 100th day of school? Definitely, my kids!  One year, one of my kinders told me he was excited to become a first grader, but I think he was a bit let down when I told him there were 84 more days to go for that to happen.  

That being said, here are some fun activities we've done in the past.  I also created the 100 Day packet for the kids to work on on the 100th day. It works for K-3 as many of the writing prompts are open ended. It includes 20 pages filled with 100 day writing  and math activities (ex. I could eat 100.., I would want 100), graphing activities and addition activities using the information from the graph, creating 100 items, and counting 100 with coins. It also includes  editable certificates, crown and a 100th Day banner.  Grab it HERE!


We created 100th day crowns.


We worked on our 100 Book that includes writing and math activities.


We made our 100 day snack and had plenty to send home! Parent letters are included!


Some kids decided to create scenes with their snack!


Some of my favorite past 100 day activities:

100 year old portraits


Create a 100 days snack- YUM! 


Make 100 with Fudge Stripe cookies and sticks

Dab a 100 dots with a bingo marker.


Enjoy your 100th day!


Tuesday, December 30, 2014

New Year's Resolutions


 Happy 2015! New Year's Resolutions!

The new year is right around the corner.  It's usually the time that we all try to find a resolution to become a better version of ourselves.  I always try to become a bit more organized... so we'll see how it goes!  If you are looking to become more organized, check out the large selection of labels and editable signs at my store. Just click on the tab to the left that says, Editable Items. Here's a sample of some of the labels available (the labels come blank for you to edit):

In the classroom, I always like to explain that a New Year's resolution is a goal or promise we make to ourselves that will help us become even better at something. Then, we try to think about what we can do to accomplish our goals.

The project below is really easy to make and the kids love it! 


For the hat, I created a triangle tracer for the children to trace on scrapbook paper, wallpaper, or construction paper (if you'd like), and a tracer for the hat trim to fit the bottom of the hat. The kids loved trying to match their trim to their hat!

For the head, just cut a rectangle about 5 1/2 x 7 inches on skin color.  I taught the kids how to create face shapes and circles by just 'cutting the corners' and it works great for kids from K to 2!  This also helps to alleviate the prep time of having to trace circle shapes and oval shapes. 

My kids used the same trick of 'cutting the corners' for the eyes. I cut white paper about 1 x 1 and they did the rest. 

**Once my kids learned this trick, I never had to trace a circle shape or oval face again! Bonus!**


How to cut the corners:

Lastly, add yarn or construction paper for hair and add the blower (you can grab these at the dollar store!)

Just thought I'd share the newest product at my store that I'm really excited about: Community Helpers. It includes a 15- page reader for the children to learn about each community helper.  Then, they can  complete their own community helper book based on each helper.  It includes various writing prompts and activities similar to my best seller Label It! and many more. Check it out.


http://ordermy2017bsbfkit.com/

For those of you who are looking ahead and planning for February and Dental Health Month, have you grabbed your FREE Bright Smiles, Bright Future Kit yet? 

The great people at Colgate provide a classroom kit for K-1 with books (for whole group and students), DVDs, parent information, and a class set of toothbrushes, toothpaste samples, and much more.  To order your Bright Smiles, Bright Future kit sign up now by clicking here! 
Once you sign up, you'll receive the kit each year!

There is also some great dental health information you can download at their website for K-1 and 2-3. Click here to check it out.
Here's a sample:
ENJOY YOUR KIT!

If you are looking for a fun activity for Dental Health Month, check out my FEBRUARY POST for this fun FREEBIE!


Wednesday, December 10, 2014

Polar Express, December Fun and Winter Ideas!


Polar Express is one of my favorite activities I do with my kids! Kids love it, no matter what their age!

I created this Polar Express Unit which contains everything you'll need in the month of December to plan a perfect Polar Express Day for K-1 and have activities for all of December! 

I've also created a Polar Express Unit for Grades 2-3, check it out here!


Everything you need is included- from letters to parents, invites for kids, tickets, letter from Santa, conductor hats, an emergent reader, writing paper, language arts and writing activities, math activities and winter math centers all geared for young children. 
 I've also included a write up on how I did Polar Express Day in case you need some ideas. Here are just some of the activities:

Recently updated (Dec 2022) to include even more activities! 


You'll also receive my Vehicles Pattern Activity for FREE (below) for a limited time so that kids can create a pattern center with trains!


Here are our bells from Santa!

Grab a FREEBIE color by number ! 


A little Christmas cheer for you... enjoy this freebie from my store for comparing numbers. Grab it here! There are 3 different levels so you can use it K-3.  Enjoy! 


CRAFTS AND IDEAS FOR THE CLASSROOM
One of my favorite crafts to make with the kids is the Five Snowman Ornament and Poem.

It's not too hard to make. Here's a quick rundown:
I use a round plastic ornament. 
This year, we used blue, gold and green. 
Before you begin, you may want to write the child's name or initials at the top of the ball.  Once you have the little hand prints done, you'll never remember who belongs to each hand print =)
1. Paint each child's hand with white paint and place the ornament in the center on their palm. The child wraps their fingers around the ornament (as if they are holding a tennis ball) and then releases it.  
2. The next day, I hand out Painty Pens to add the hat, scarf, arms, buttons,snowflakes and the face.
When all is dry, hole punch and tie on the poem with a ribbon.  All done!!

We wrapped our ornaments in a clear cellophane bag with a little tissue paper and tie it with a ribbon. They looked great!

 
.There are a few choices of poems.

There is an updated one in my store as well! 
You can grab a copy of this poem to print out at my store by clicking here!  Enjoy and happy holidays!

Other fun holiday projects:

Create Christmas trees with strips of green paper  cut in different sizes in length and have children practice putting them in size order. Add ornaments with circle stick ons or hand out small squares and have children cut off the corners to create circles. 
Another suggestion could be using the hole puncher to cut out small circles.  Complete the tree with a star. These were stars that were copied on yellow paper and cut out. 


 Students can create Menorahs:

Each student gets 10 short strips and 1 long blue strip of paper. 9 of the strips are used for candles and 1 strip is cut in half and used to create the stand.  You can use yellow tissue paper for the lights.


Reindeer are also so much fun to create
 using the student's hands:
Follow the directions below.
This is not my idea..but I do not know where the original idea came from.. please let me know if it's you!
I always like to make a cheat sheet so I know what I need for the craft at a quick glance. Here's what you need to create the reindeer:


Sock snowmen:


After reading The Snowy Day, create your own snowy day writing.  
Create the snow paint by mixing equal parts shaving cream with equal parts of glue.


Have your kids 'Elf Themselves' with this glyph. Grab it here.


Snowman Ornament:
Paint both sides of a large popsicle stick white.  Add a cute face with some sharpies and glue on some sequins or buttons.  Cut out a felt hat and tie on a felt scarf to finish the ornament. I used a hot glue gun to add on the string, but you could use regular glue ahead of time to make it easy!

Another cute idea is to do the same thing with a paint stirrer and add the inch markers to it. Use it to measure the snow!  


Need a quick and easy way to decorate your room, I created these banners which are so easy to put up. Just print, cut and fold over.  Hang up a string to hang them on and that's it.
 I usually print mine on card stock, cut them out on a paper cutter and they last! Each banner has an original chevron, polka-dot or festive background and a picture to separate words as seen below:
 Enjoy!